Tampilkan postingan dengan label Herbs and Spices. Tampilkan semua postingan

Minggu, 03 Juli 2022

Best VideosChive Blossom Salt SISGUFANG


© 2022 | http://angiesrecipes.blogspot.com


© 2022 | http://angiesrecipes.blogspot.com


© 2022 | http://angiesrecipes.blogspot.com


© 2022 | http://angiesrecipes.blogspot.com


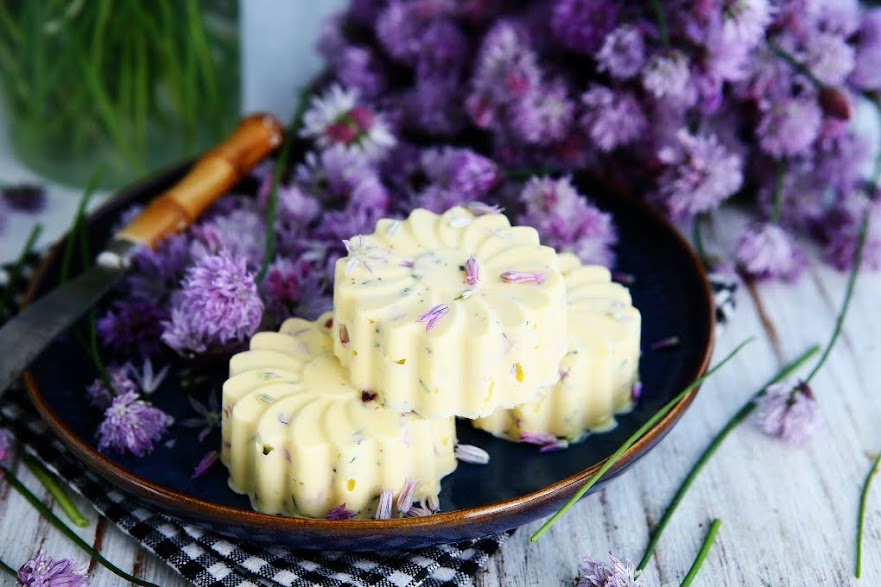
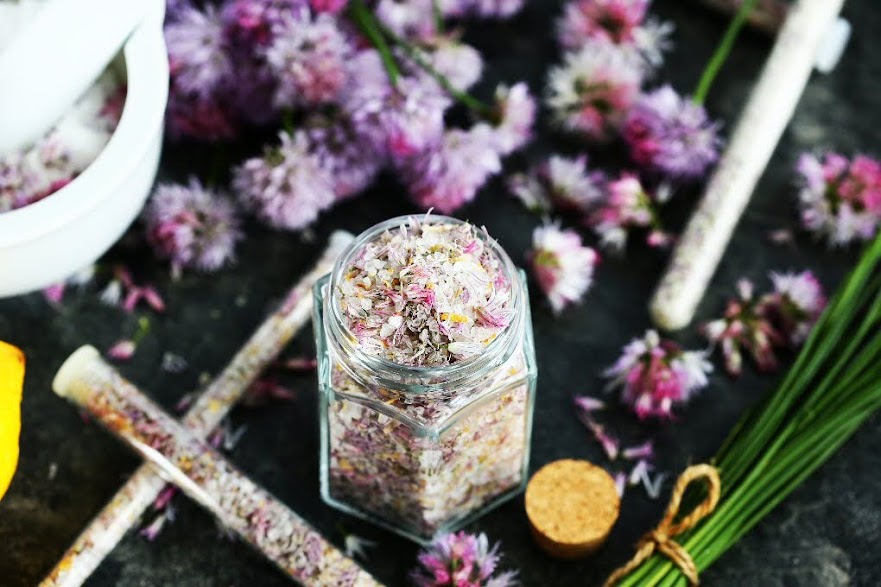
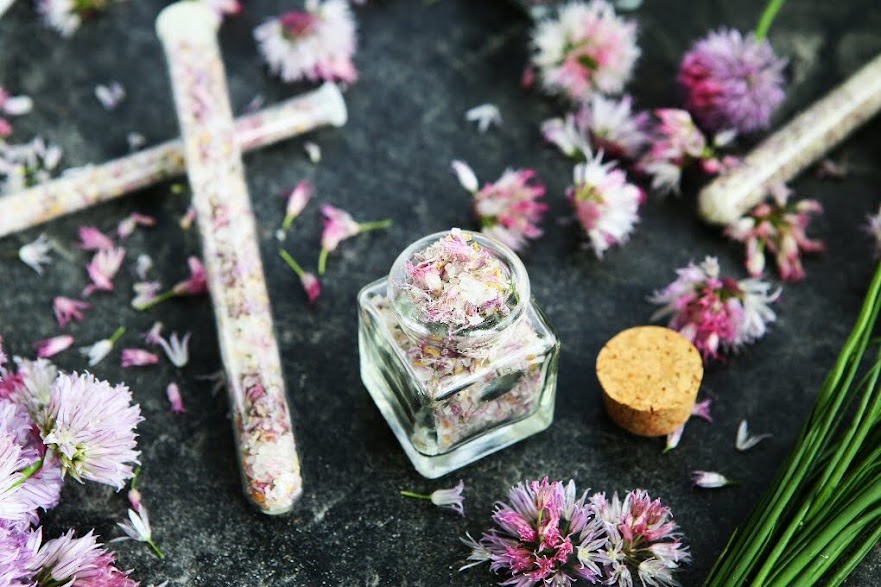
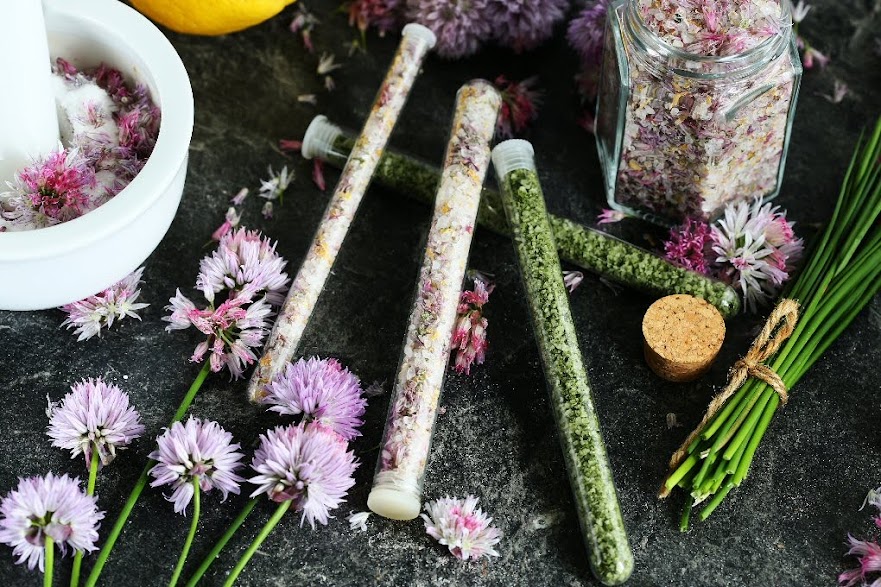
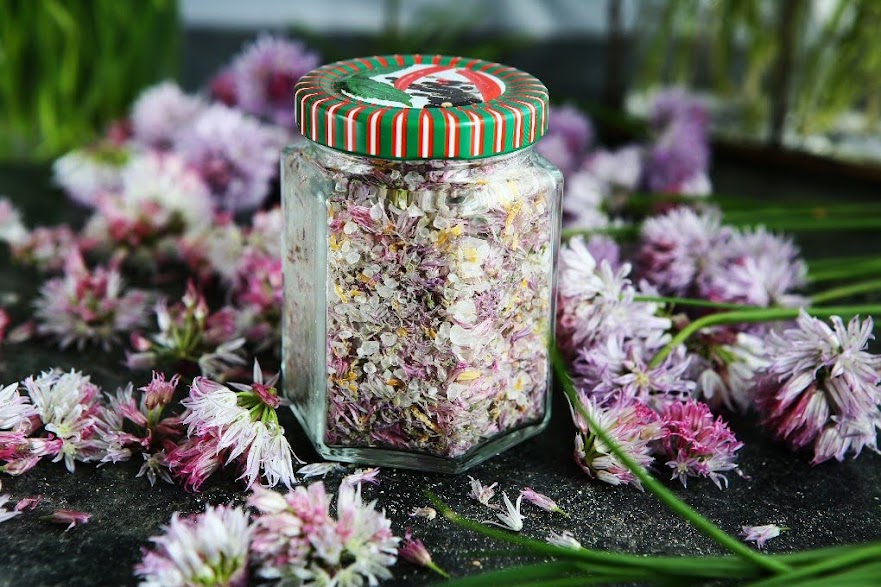
Finishing salts are an easy and perfect way to use the herbs in your garden and they make beautiful and delicious handmade gifts for the family and friends. The chive blossom salt not only tastes fantastic, but also looks great with its light purple colour.

You can use chive blossom salt on grilled meats and veggies, sprinkle it over avocado toast, and salads, or use it to make a compound butter. My favourite way to use it is to season a blue steak, salad, roasted asparagus and Quark cheese-so simple yet so dang tasty.


Read more »

Kamis, 26 Mei 2022

Best VideosChives Blossom Butter SISGUFANG


© 2022 | http://angiesrecipes.blogspot.com


© 2022 | http://angiesrecipes.blogspot.com


Chive blossoms are a colorful and flavourful edible flower that will appear at the end of chive stalks in late springtime. These pale purple pompoms taste slightly stronger than the chive leaves, but still very mild, and they are simply beautiful in a wide range of recipes.

Chive bloosm flavoured butter is an easy compound butter, that makes food so much more interesting and better with that delicate onion flavour. The flowerless chive leaves are available all year round in supermarkets, but not the blossoms. If you don't grow chives, you might be able to find these scrumptious little gems at farmers markets in May and June, or forage them in the wild.


  • 1 tsp Chopped chives
  • 12-15 Chive blossoms
  • 250 g Unsalted butter, softened
  • 1/3 tsp Himalayan pink salt

  1. Thoroughly wash the chive and the blossoms. Pat them dry with paper towels or dry them in a salad spinner. Finely chop the chives. Separate the flower petals from the stem.
  2. Mix salt into butter. When the salt is completely incorporated into the butter, add in the chopped chive and blossoms. Mix until well blended.
  3. Fill a few of silicone muffins cups with butter and freeze for 30 minutes. Once they are firm, it's very easy to remove them. Store the butter, covered or wrapped, in the fridge a couple of hours to let the flavours meld.
  4. You can simply throw the butter in a container or jar, or shape it into a log. Chill until firm. Use the chive blossom butter for bread, steak, fish, grilled vegetables or to toss with pasta.


© 2022 | http://angiesrecipes.blogspot.com


© 2022 | http://angiesrecipes.blogspot.com


© 2022 | http://angiesrecipes.blogspot.com


© 2022 | http://angiesrecipes.blogspot.com


Kamis, 05 Mei 2022

Best VideosHarissa Honey Chicken Lollipops SISGUFANG


© 2022 | http://angiesrecipes.blogspot.com


© 2022 | http://angiesrecipes.blogspot.com


This particular chicken lollipop recipe is a Indo-Chinese favourite appetizer where frenched chicken wings are marinated, baked (or fried) until crisp and tossed with a sticky sweet and hot sauce (harrissa honey sauce). Simply put, chicken lollipops are the fried chicken wings but with a more distinct look and spicy flavour.

The name “chicken lollipop” is referring to how the chicken wings look after trimming. To achieve the lollipop appearance, the meat on the chicken wing is cut loose from the bone end and pushed down, a culinary technique known as “frenching.”
The recipe is actually very simple. The hardest part of the recipe is to form the chicken lollipops from chicken wings. If you plan to make a huge batch for a crowd, fry the chicken lollipops and make the sauce in advance. Then you can re-crisp the wings at a high temperature for a couple of minutes, re-heat the sauce, and toss to coat just before serving.

Here is a video on how to cut lollipops from the wings that I found on youtube.


Harissa Sauce

  • 8-10 Whole chicken wings (or simply use meaty chicken drumettes)
  • 1 tbsp Cumin powder
  • 1 tbsp Criander powder
  • 1 tsp Garlic powder
  • 1/3 - 1/2 tsp Cayenne pepper
  • 2/3 tsp Sea salt
  • Black pepper to taste
  • Herbs and greens to garnish
  • Pomegranate seeds to garnish

  • 85 g Salted butter
  • 100 g Harissa
  • 1 tbsp Lemon juice
  • 80 g Honey


  1. Divide the chicken wing into 3 parts (drumette, winglet and wingtip) by slicing through the joints. Save the wingtip for other uses.
  2. French the drumette. Holding the drumette (which looks like a chicken drumstick) by the meaty end, use a small, sharp knife to cut around the thin end of the drummette so the meat and skin are released from the bone. Push the meat down towards the fat end to create a lollipop.
  3. French the winglet / flat. For the winglet, which contains two bones, cut the joint where the bones meet. Trim a small section of the meat from the circumference of that area to expose the bones. Remove one of the bones and push the meat to the end of the remaining bone to form a lollipop.
  4. Transfer the prepared wings to a medium bowl. Add in ground cumin, coriander, garlic powder, cayenne pepper, salt and pepper. Rub the spice mixture into the wing pieces until there is no powder left in the bottom of your bowl. Cover and refrigerate for at least 1 hour, up to overnight.
  5. Preheat your oven to 200C/400F and brush a baking tray with some olive oil. Arrange the chicken wings on the tray and bake in the middle of the oven for 35 minutes or until the chicken is nicely browned and slightly charred, and completely cooked through.
  6. Bring sauce ingredients slowly to a simmer in a saucepan on the stovetop while your wings are baking. When the sauce starts to bubble, turn off the heat and set aside for 5 minutes. The sauce will thickens up after cooling a bit. Toss the wings in the sauce until thoroughly coated. Serve on a bed of fresh herbs and garnished with pomegranate seeds and chopped spring onions if desired.


© 2022 | http://angiesrecipes.blogspot.com


© 2022 | http://angiesrecipes.blogspot.com


© 2022 | http://angiesrecipes.blogspot.com


Selasa, 26 April 2022

Best Videos100% Rye Banana Bread SISGUFANG


© 2022 | http://angiesrecipes.blogspot.com


© 2022 | http://angiesrecipes.blogspot.com


© 2022 | http://angiesrecipes.blogspot.com


Spiced with cinnamon, nutmeg, and aromatic cardamom and sweetened with coconut sugar and honey, this deep-dark quick rye bread with a super moist and tender texture and lots of banana flavour is a hearty and healthy take on a regular banana bread recipe. It's filled with 100% nutritious, earthy rye flour and is free from refined sugar. With a combination of over-ripe banans, aromatic warming spices, good quality honey and earthy rye flour, this bread guarantees great taste experiences. Be sure to use really ripe bananas - the more dark brown spots on the skin, the better.

Rye is a close relative of both wheat and barley. It has a deep, rich taste and is packed with vitamins, minerals and soluble fiber. Rye has been linked to a reduced risk of cardiovascular disease, colon cancer, breast cancer and diabetes.


100% Rye Banana Bread

adapted from Kingarthurbaking


  • 120 g Unsalted butter, at room temperature
  • 100 g Coconut sugar
  • 1 tsp Dr. Oetker vanilla bean paste
  • 1 tsp Cinnamon
  • 1/4 tsp Nutmeg
  • 10 Cardamom
  • 1 1/2 teaspoons Baking powder
  • 1/2 tsp Baking soda
  • A pinch of sea salt
  • 3 Large, very ripe banana, mashed plus one extra for the topping
  • 85 g / 4 tbsp Honey
  • 2 Large eggs, at room-temperature
  • 160 g Organic whole-grain rye flour
  • 160 g Light rye flour (I am using Roggenmehl #997)

  1. Preheat the oven to 160C/325F. Lightly grease or line a 9-10" x 5" / 24-26 cm x 12cm loaf pan with parchment paper.
  2. In a large bowl, beat the butter, coconut sugar, vanilla paste, spices, baking powder, baking soda, and salt until smooth.
  3. Add the mashed banana, honey, and eggs. Mix until combined. Add the flours, stirring just until combined and smooth.
  4. Spoon the batter into the prepared pan, smoothing the top. Cut a whole banana in half lengthwise and lay the two halves, cut side up, atop the loaf.
  5. Bake the bread for 60 to 70 minutes, or until a long toothpick or skewer inserted into the center comes out clean, or with a few wet crumbs clinging to it.
  6. Remove the bread from the oven and allow it to cool for 10 minutes in the pan. Turn the bread out of the pan, and cool completely on a rack.


© 2022 | http://angiesrecipes.blogspot.com


© 2022 | http://angiesrecipes.blogspot.com


© 2022 | http://angiesrecipes.blogspot.com


Sabtu, 16 April 2022

Best VideosEasy Melt&Mix Date Bars with Macadamia Nuts and Mahlep SISGUFANG


© 2022 | http://angiesrecipes.blogspot.com


© 2022 | http://angiesrecipes.blogspot.com


© 2022 | http://angiesrecipes.blogspot.com


This quick and delicious treat is perfect for an afternoon snack, a breakfast bite or an indulgent but healthy dessert. A classic melt and mix date bars recipe made with date syrup (or golden syrup), coconut sugar (light brown sugar is a good substitute), butter (or coconut oil if you prefer), macadamias (or nut of your choice), and dates, of course. The real star of these cookie bars is mahlep.

Mahlep, Mahalepi or Mahlab, used mainly in holiday breadmaking, cookies and pastries in the Middle East countries, is an aromatic baking spice made from the seeds of the mahaleb cherry, aka rock cherry, prunus mahaleb, and St. Lucy's cherry. Mahlep tastes a bit like cherries, bitter almond with a hint of rose and vanilla. Once baked, it becomes fruity and rich, but subtle. The seeds either have to be ground or boiled as an infusion and strained to obtain the most flavor. You can find it in Greek and Middle Eastern food shops or Amazon. (I got mine from a local Turkish store), As it comes from a seed, powdered mahlab is more vulnerable to get rancid and spoiled, so it’s best to buy it in small quantities, and store it in a cool, dry place. Whole mahlab whole seeds store well in the freezer for a very long time. Grind it just before using for best results.


Read more »

Kamis, 07 April 2022

Best VideosHow to make Wild Garlic Salt SISGUFANG


© 2022 | http://angiesrecipes.blogspot.com


© 2022 | http://angiesrecipes.blogspot.com


© 2022 | http://angiesrecipes.blogspot.com


© 2022 | http://angiesrecipes.blogspot.com


A great way to make the most of the very short wild garlic season is to find delicious ways to preserve them so that they can be enjoyed all year round. The deep intense flavour of wild Garlic foraged from the forests on the Rhine blended with sea salt makes this seasoning really healthy and addictive. This flavoured salt gives every dish that certain something extra and can be enjoyed in a variety of ways. It's ideal as a finishing salt for barbecued meats, sprinkled over fresh vegetables, on pasta, or baked into fresh bread. Use sea salt for your infused salt. It is much more aromatic and contains no additives such as iodine, which can lend a bitter taste to foods salted with table salt. Whether you take a small or large crystals is up to you. Coarse sea salt with wild garlic is perfect for the spice mill.


  • 500 g Sea salt, fine or coarse
  • 100 - 200 g Wild garlic leaves, roughly chopped (depends on how green and strong you prefer)

  1. Rinse the wild garlic leaves and pat them dry using kitchen paper or a kitchen towel. Roughly chop the wild garlic leaves.
  2. Place the chopped garlic leaves in a food processor. Add in 100 grams of sea salt. Blend them into a smooth paste.
  3. Pour the remaining salt into a bowl and add the wild garlic paste. Mix thoroughly until all of the salt is consistently green throughout.
  4. Spread out the mixture in a thin layer on a baking sheet lined with parchment paper. Let the wild garlic sea salt dehydrate in the oven for about 2-3 hours at 50C/120F degrees. You can also dehydrate the infused salt in your dehydrator. Check the salt once an hour and mix to make the salt dehydrate completely. If weather allows, dry the mixture in the sun for 24 hours or until completely dry.
  5. Place the wild garlic sea salt in an airtight container and leave it in a cool, dry, dark location. The flavoured salt does not have an expiry date but will lose its intensity over time. If you store it properly, it can potentially have an indefinite shelf life. But for optimal flavour and colour, use it up in 2-3 years or just until next wild garlic season.


© 2022 | http://angiesrecipes.blogspot.com


© 2022 | http://angiesrecipes.blogspot.com


© 2022 | http://angiesrecipes.blogspot.com


© 2022 | http://angiesrecipes.blogspot.com


© 2022 | http://angiesrecipes.blogspot.com