© 2022 | http://angiesrecipes.blogspot.com
  © 2022 | http://angiesrecipes.blogspot.com
 Earthy, intense and rich Mole (pronounced moh-leh) is most representative of Mexican cuisine. The word Mole derives from the language of the Aztecs, molli (or mulli), which just means “sauce,” Mole is generally a thick, dense sauce, ranging from red to green to black, and should never be runny. There are hundreds of variations of mole in Mexico, depending on where you are and the season.
This basic (not exactly authentic, but delicious all the same) mole sauce is made by toasting and combining some dried chillies (guajillo chillies, Kashmiri red chillies, ancho chillies) spices (cinnamon, anise, coriander, cayenne, cardamom), dark chocolate, herbs (oregano, thyme and cilantro), thickeners (old bread, nuts or/and seeds) and homemade broth. Serve it as a main course with savoury, rich, crunchy pork belly, melt-in-mouth pulled pork and juicy, tender chicken or spoon over tacos and enchiladas. Once you’ve made the sauce, you can use it for practically anything. Pork belly is a staple at our dinner table and paired with the rich, complex mole sauce is literally heaven on earth.
| Pork Belly | Basic Mole |
|---|
- 750 g-900 g Pork Belly
- 1 Star anise
- 1/2 tsp Coriander seeds
- 1/2 tsp Cumin seeds
- 1/2 tsp Black peppercorns
- 1/3 tsp Szechuan peppercorns, optional
- 10 cm / piece Ginger root, sliced
- 2 Garlic cloves
- Black salt to taste
- 1 L Water
|
- 8 Dried Kashmiri red chillies, , stemmed and seeded
- 10 Dried Guajillo chilies, stemmed and seeded
- 4 Dried ancho chiles, stemmed and seeded
- 150 g Unsalted roasted peanuts
- 30 g Pumpkin seeds
- 1 Hard roll, torn into smaller pieces
- 1/3 tsp Powdered cloves
- 1/3 tsp Cardamom powder
- 1/3 tsp Freshly milled black pepper
- 1 tsp Coriander powder
- 1 tsp Cumin powder
- 1/2 tsp Anise powder
- 1/2 tsp Cayenne pepper
- 1/2 tsp Cinnamon powder
- 3 tbsp Ghee, butter or lard
- 1 Shallot, diced
- 5 Garlic cloves, soaked in honey, crushed
- 50 g Raisins
- 1 tsp Dried thyme
- 1 tsp Dried oregano
- 1-3 tbsp Garlic-infused honey
- 70 g Dark chocolate, chopped
- Salted, roasted peanuts, crushed for garnish
- Cilantro, chopped for garnish
|
- Place the pork belly in your slow cooker, add in spices, and salt. Fill the slow cooker with water. Cook for 3-4 hours on high. The pork belly should be tender, soft, but not fallapart. Remove the pork belly to a tray or plate and cool completely. I usually leave it in the fridge, uncovered, overnight, so the skin dries up. Reserve the broth.
- Poke lots of little holes on the pork belly and cut into 4 squares or any desired sized pieces. Season with more salt and pepper. Place them in the basket of your air fryer and cook for 15 minutes at 180C/350F. Increase the temperature to 200C/400F and cook for a further 3 minutes until the pork skin is golden, crispy and puffed up.
- Preheat the oven to 200C/400F. Place all the dried chillies to the aluminum foil–lined baking tray and toast, turning once, until dark and fragrant, about 3 minutes. Place peanuts, pumpkin seeds, bread pieces, and spices in another tray and set it at the bottom of the oven.
- Meanwhile, fill a medium saucepan with 500 ml of reserved broth. Set the saucepan over low heat. Transfer toasted chillies to the saucepan with broth. Remove another tray with peanuts, bread and spices and add all the ingredients to the saucepan too.
- Heat the ghee, butter or lard in a skillet over medium-high heat. Add in chopped shallot and stirfry for a couple of minutes. Add in crushed garlic cloves and fry for just a few seconds. Stir in raisins and herbs. Transfer the whole mixture together with the honey to the saucepan too. Bring the mixture to a gentle boil and remove from heat. Purée the mixture using a stick blender to make a smooth thick mole.
- Transfer the mole to a large skillet. Add in dark chocolate and enough of broth to allow the mixture to blend. Process until completely smooth.
- Cook the mole sauce over low heat for 10 minutes until it thickens, stirring frequently. Add in more garlic honey and/or broth as needed.
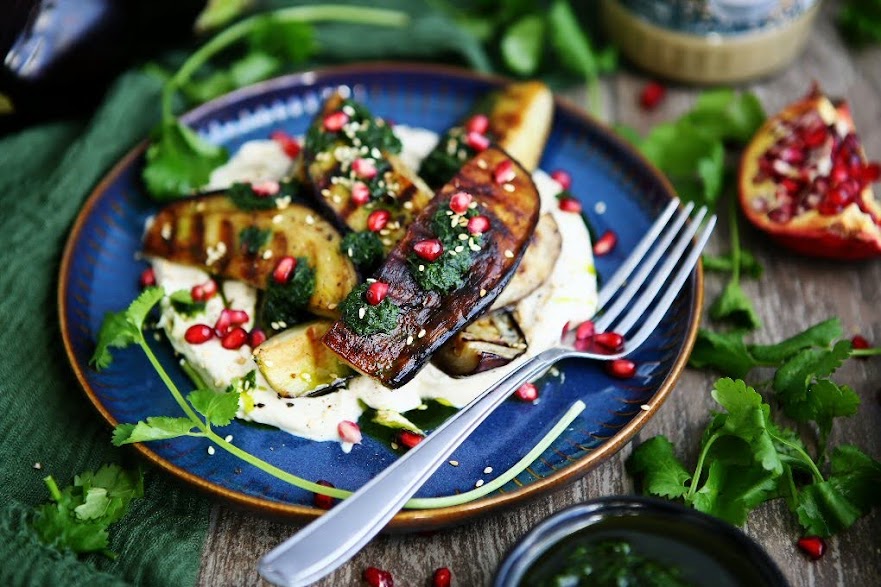
- Spoon some mole sauce on serving plates, arrange crispy pork belly over mole sauce and garnish with crushed peanuts and chopped cilantro.
 © 2022 | http://angiesrecipes.blogspot.com
  © 2022 | http://angiesrecipes.blogspot.com
 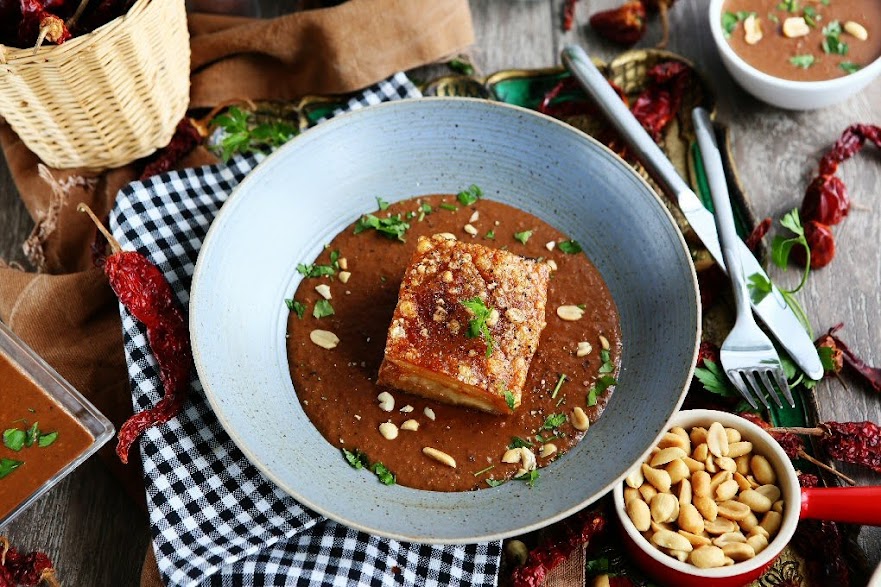 © 2022 | http://angiesrecipes.blogspot.com